Understanding and Setting Up Roles
ON THE CRM
What Are Roles?
Roles are a fundamental security and organizational feature in your CRM system. They allow you to define specific sets of permissions and access levels for different staff members or departments. By assigning roles to staff, you can control exactly what features, data, and actions each person or team can access and perform within the system.
Key Benefits of Using Roles:
• Enhanced Security: Restrict access to sensitive information and critical functions
• Better Organization: Structure your team's access based on job responsibilities
• Improved Efficiency: Users only see and access tools relevant to their work
• Compliance: Maintain audit trails and enforce data access policies
• Scalability: Easily manage permissions as your team grows
Understanding Permission Types
The role system uses several types of permissions:
1. Global Permissions: Apply across the entire system (e.g., "View All Records", "View All Global")
2. Module-Level Permissions: Control access to specific modules like Leads, Traders, CRM, Appointments, etc.
3. Action Permissions: Determine what actions can be performed (View, Create, Edit, Delete, Approve)
4. Department Permissions: Restrict visibility to records within specific departments
5. Data-Level Permissions: Control visibility of specific record fields and information
The system typically includes:
- Administrator: Full system access
- Staff: Basic staff permissions
- Manager: Departmental management
- Support: Customer support focused
- Sales: Sales and lead management
Example Permission Actions:
• View (Global) - View all records system-wide
• View (Own) - View only records created by the agent
• View (Private/Confidential) - View sensitive or private records, which are marked as such
• View (Department Only) - View records within the user's department
• Create - Add new records
• Edit - Modify existing records
• Delete - Remove records
• Approve - Authorize or approve actions
How to Create a New Role
Follow these steps to create a new role in your CRM
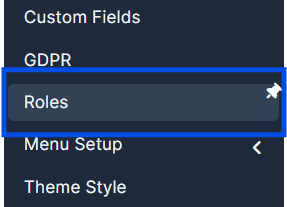
Step 1: Go to "Setup" at the bottom of the settings menu on the left sidebar.

Step 2: Access the "Roles" Section from the submenu.
You will be directed to the Roles management page where you can see all existing roles and their statistics.
Step 3: Create "New Role" button at the top of the page
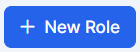
• This will open the role creation form
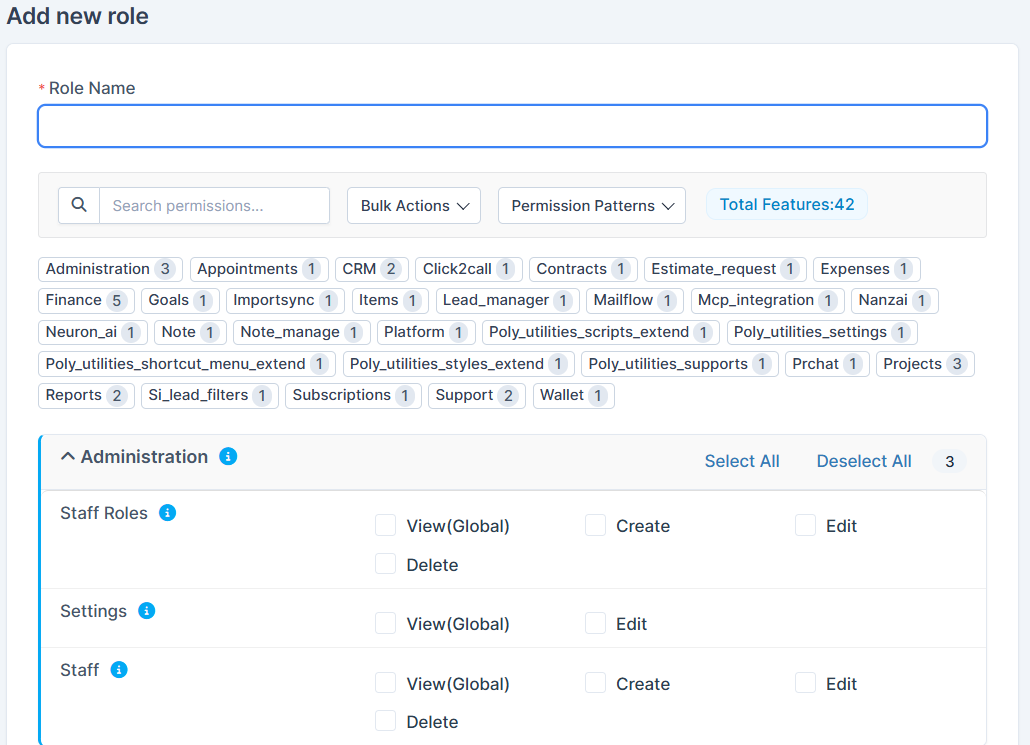
Step 4: Assign a "Role Name" and tick any required boxes for permissions that the role should have.
Configure Role Basic Information
• Enter a descriptive "Role Name" (e.g., "Sales Agent", "Customer Support", "Finance Manager")
• The system will automatically generate a slug for internal use
• Choose a "Group" category for organizational purposes
Step 5: Set Module Permissions
The role editor displays all available system modules with 42 total features. For each module, you can:
• Access the Module: Toggle permissions for each module (Administration, Appointments, CRM, Click2Call, Contracts, etc.)
• View Search Bar: Use the search field to quickly find specific modules or permissions
• Bulk Actions: Use the "Bulk Actions" dropdown to quickly apply or remove permissions for multiple items
• Permission Patterns: Use predefined permission patterns as templates for common role types
Step 6: Configure Granular Permissions
For each module, define specific actions:
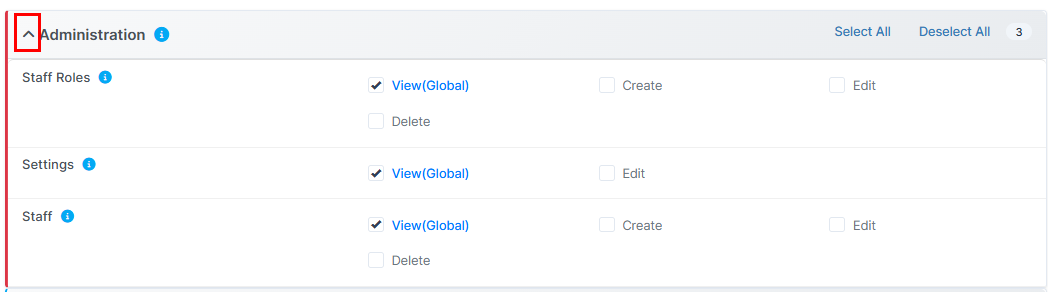
For Administration Module:
• Staff Roles: Manage viewing, creation, editing of staff roles (View Global, Create, Edit, Delete options available)
• Settings: Control access to system settings (View Global, Edit options)
• Staff: Manage staff access (View Global, Create, Edit, Delete)
For CRM Module (Example):
• Traders: Define access levels for trader records
- View (Own): See only their own records
- View (Global): See all trader records
- Create: Add new traders
- Edit: Modify trader information
- Department View: Restrict to department records
- Show Email/Phone: Control visibility of contact information
- Assign (Global): Allow assignment of records system-wide
- Assign (Department): Restrict assignments to department only
For Leads Module:
• View Permissions: Set visibility scope (Global, Own Records, Private/Confidential)
• Edit Records: Allow modification of lead data
• Convert Lead to Trader: Enable conversion functionality
• Email Display: Show/hide email addresses
• Edit Status: Allow status changes
Step 7: Save the changes by clicking the "Save Settings" button in the bottom right corner of the page.
Once pressed, your new role will be created.
• Click the "Save Settings" button at the bottom of the form
• The system will confirm the new role has been created
• Your new role will appear in the Roles list with a count of assigned features

Managing Role Permissions
Understanding the Permission Interface
When editing a role, you'll see several helpful features:
1. Permission Search: Quickly locate specific permissions using the search box (type to filter by module or permission name)
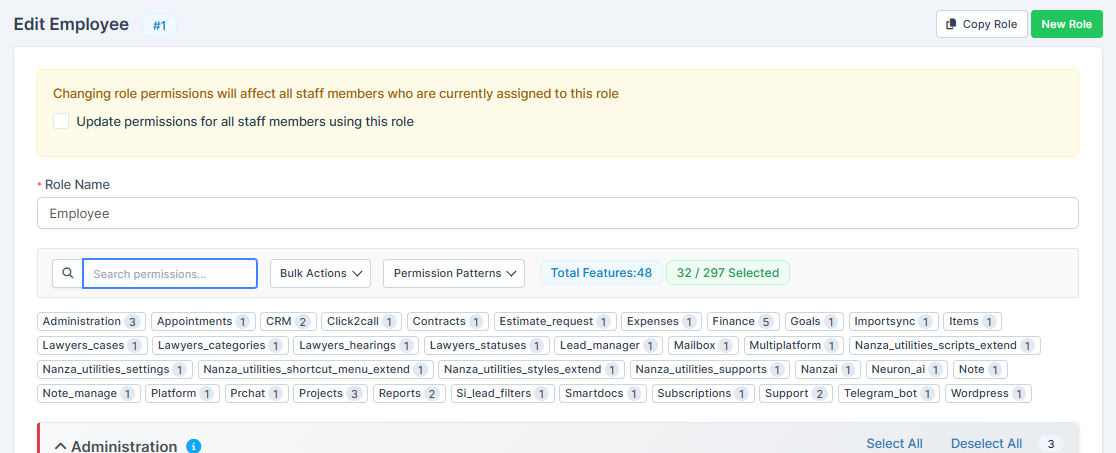
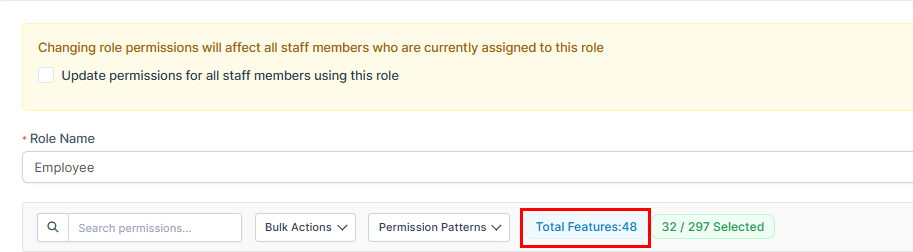
2. Total Features Counter: The system shows "Total Features:42" indicating available permissions. For example, "32 / 273 Selected" means 32 out of 273 total permission checkboxes are enabled for this role.
3. Module Badges: Each module shows a badge with the number of permissions granted for that module. For example:
- Administration: 3 permissions
- Appointments: 1 permission
- CRM: 2 permissions
- Click2Call: 1 permission
- Contracts: 1 permission

4. Quick Navigation: Expand/collapse sections by clicking on module names to show or hide their permission options
Permission Levels Within Modules
Each module typically includes multiple permission types:
• View Permissions: Who can see the records (checkboxes for different scope levels)
• Create Permissions: Who can add new records
• Edit Permissions: Who can modify existing records
• Delete Permissions: Who can remove records
• Approve Permissions: Who can authorize actions
• Report Permissions: Who can view or generate reports
• Export Permissions: Who can export data
Duplicating Roles
In the case if you need to create a duplicated role (for example for other set of team members and a department), you don't have to re-apply the same permissions by hand.
This is much faster than creating a role from scratch and is ideal for creating department-specific variations of existing roles.
If you need to create a similar role with slight variations:
Step 1: Go to "Setup" at the bottom of the settings list.
Step 2: Click on "Roles".
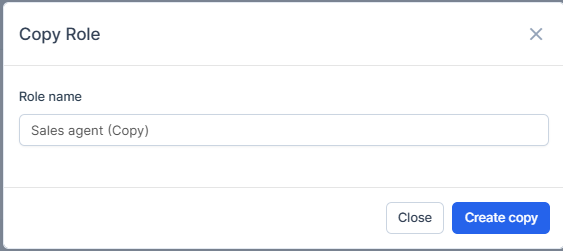
Step 3: Click "Copy" button on the role edit page
![]()
Step 4: Give the new role a different name in the "Role Name"
Step 5: Modify only the permissions that differ from the original
Step 6: Press on "Create Copy" to save the changes. You will see the green approval message that the role was created and will be able to find it in the list as the page refreshes.

Importing Roles
You can also import pre-configured roles from other systems.
This feature is useful when:
• Migrating from another CRM system
• Replicating setups across multiple instances
• Using template roles provided by your organization
Step 1: Go to the "Roles" list page
Step 2: Click the "Import Role" button

Step 3: Select the file or source containing the role configuration by pressing on "Download"
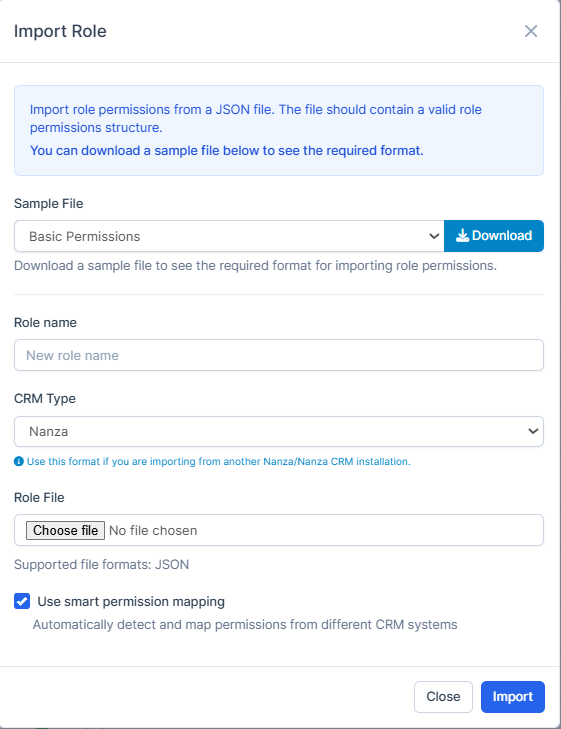
Step 4: Review and confirm the imported permissions by pressing on "Import"
Step 5: The imported role will be added to your system
Assigning Roles to Staff Members
Once you've created roles with appropriate permissions, you need to assign them to your staff members.
How to Assign a Role to a Staff Member
1. Navigate to the Staff section from the main menu
2. Select the staff member you want to assign a role to
3. In the staff profile or settings, look for the "Role" or "Assign Role" field
4. Select the desired role from the dropdown menu
5. Save the changes
Viewing Staff Members with Specific Roles
From the Roles list page, you can see:
• "Total Users" column shows how many staff members are assigned to each role
• Click on the user avatars to view specific staff members assigned to that role
• "Assign Staff" button allows you to quickly add more users to a role
Role Filters
On the Roles management page, you can filter roles by:
• "All" - View all 11+ roles in your system
• "Roles with Users" - See only roles that have staff members assigned
• "Roles with No Users" - Identify unused roles that can be archived or deleted
Best Practices for Role Management
1. Create Clear Role Names
• Use descriptive names that reflect job functions
• Avoid abbreviations unless widely understood
• Examples: "Sales Agent", "Support Manager", "Finance Officer"
• Avoid: "User", "Person", or generic names
2. Follow the Principle of Least Privilege
• Grant only the minimum permissions necessary for each role
• Start with limited permissions and add more as needed
• Regularly audit roles to remove unnecessary permissions
• This reduces security risks and accidental data modifications
3. Group Related Permissions
• Create roles for specific functions rather than individual users
• Use consistent permission patterns across similar roles
• Document which roles have access to which modules
4. Use Department-Level Restrictions
• Leverage "View (Department Only)" and "Assign (Department)" permissions
• Keep staff visibility limited to their own department when appropriate
• Prevents cross-department data leakage
5. Regular Permission Audits
• Review role assignments quarterly
• Update permissions when staff responsibilities change
• Remove roles that are no longer in use
• Track who has administrative permissions
6. Document Your Role Structure
• Maintain a list of all roles and their purposes
• Document who has admin access
• Create a responsibility matrix showing which modules each role can access
• Update documentation when roles change
7. Admin vs. Regular User Roles
• Limit the number of admin/staff role configurators
• Use the "admin" role for system administrators only
• Create department-specific "manager" roles instead of giving everyone admin access
• Separate viewing permissions from administrative permissions
8. Test Before Rolling Out
• Create new roles in a test environment first
• Verify that staff with the role can perform required tasks
• Check that they cannot access restricted data
• Get feedback before applying to the entire team
9. Monitor Permission Changes Impact
• The system shows a warning: "Changing role permissions will affect all staff members who are currently assigned to this role"
• Always save changes with this in mind
• Communicate role changes to affected staff members
• Provide training on new permissions or restrictions
10. Leverage Template Roles
• Use the Copy Role feature to create variations
• Establish a set of standard roles for your organization
• Import and export roles for consistency across systems
Common Role Configuration Examples
Example 1: Sales Agent Role
Permissions Typically Included:
• Leads Module: View (Own/Global), Create, Edit, Convert to Trader, Email Display
• CRM (Traders): View (Global), Create, Edit, Assign (Global)
• Appointments: View, Create, Edit
• Reports: View sales-related reports only
• Limited Admin: View staff roles, no editing
Permissions NOT Included:
• Settings editing
• Staff management
• Finance/Accounting modules
Example 2: Finance Officer Role
Permissions Typically Included:
• Finance Module: Full access (View, Create, Edit, Delete)
• Reports: Full access to financial reports
• Expenses: View and manage all expenses
• Leads Module: View (Global) for reference
• Settings: View financial settings
Permissions NOT Included:
• Staff management
• Appointment booking
• Sales module editing
Example 3: Department Manager Role
Permissions Typically Included:
• All modules within department: View, Create, Edit
• Staff: View and manage department staff only
• Reports: View department reports
• Leads: Assign (Department Only)
• Appointments: Create, view department appointments
Permissions NOT Included:
• Delete critical records
• Access other departments
• System settings changes
• Role configuration
Example 4: Support Agent Role
Permissions Typically Included:
• Leads: View (Own/Department), Add notes
• Support tickets: Create, View, Edit (own), Reply to tickets
• Knowledge Base: View
• Appointments: View to check availability
• Email/Contact Info: Full display
Permissions NOT Included:
• Delete leads or tickets
• Access to finance data
• Staff management
• System administration
Frequently Asked Questions
Q: Can I change a role's permissions after staff are already assigned to it?
A: Yes. When you modify a role's permissions, the system will alert you that "Changing role permissions will affect all staff members who are currently assigned to this role." All assigned staff will immediately have their access updated. Always notify affected staff members of significant permission changes.
Q: How many roles can I create?
A: You can create as many roles as needed. However, it's best practice to keep your role structure organized and maintainable. Most organizations use 5-20 core roles.
Q: What's the difference between "View (Own)" and "View (Global)"?
A: View (Own) restricts visibility to records the user created. View (Global) allows viewing all records of that type in the system. For sensitive data, use View (Own) or View (Department Only).
Q: Can I assign multiple roles to one staff member?
A: The system assigns one primary role per staff member. If you need multi-role functionality, create a composite role that combines permissions from multiple job functions.
Q: How do I delete a role?
A: From the Roles list page, click the delete icon (trash can) next to the role. Note: You cannot delete roles that have active staff members assigned. First reassign the staff to other roles.
Q: What does the "Disabled" option mean when creating a role?
A: If you toggle "Disabled" on, this role will become inactive and cannot be assigned to new staff. It's useful for archiving old roles without deleting them.
Q: Can I export role configurations?
A: Yes, use the "Export" button on the Roles list page to download role configurations for backup or to share with other system administrators.
Q: How often should I audit roles?
A: We recommend quarterly audits. Review staff role assignments, check for unused roles, and update permissions based on any organizational changes or new modules.
Q: Is there an "Admin" role limitation?
A: No, but we recommend limiting the number of users with full admin access. Consider creating department-specific "Manager" roles instead.
Q: What happens if a staff member has no role assigned?
A: Without a role, staff members will have minimal or no system access. Always ensure active staff members have an appropriate role assigned.
Troubleshooting
Issue: Staff member cannot access a module they need
Solution:
1. Verify the staff member has a role assigned (Check Staff > Role field)
2. Edit the assigned role and confirm the required module permissions are checked
3. Check for department restrictions if applicable
4. Have the staff member log out and log back in to refresh permissions
Issue: Too many staff members have access to sensitive data
Solution:
1. Review all active roles and their permissions
2. Filter roles by "Roles with Users" to see which are actively used
3. For sensitive data, use "View (Private/Confidential)" or "View (Department Only)" permissions
4. Consider creating a restricted "Viewer" role with limited access
5. Regularly audit who has access to financial or confidential modules
Issue: A role has too many permissions and is becoming hard to manage
Solution:
1. Clone the role and create a more specific version
2. Remove unnecessary module permissions from the original role
3. Split functionality into separate roles if needed
4. Use the search functionality to find and remove specific permissions
Issue: New staff member still doesn't have permissions after role assignment
Solution:
1. Ask staff member to clear browser cache or use incognito window
2. Have them log out completely and log back in
3. Check if the role has any department restrictions
4. Verify the role has been properly saved
5. Check browser console for any permission errors
Issue: Want to quickly remove all access from a departing staff member
Solution:
1. Navigate to the Staff member's profile
2. Remove or reassign their role
3. Or create a "No Access" role with no permissions and assign it
4. Save changes
5. The staff member's next login will reflect the changes
Conclusion
Roles are a powerful security and organizational tool that should be carefully planned and managed. By following the best practices outlined in this guide, you can:
• Create a clear hierarchy of access and responsibilities
• Protect sensitive data while enabling team productivity
• Simplify staff management as your organization grows
• Maintain audit trails and compliance with data policies
• Quickly onboard new staff with appropriate permissions
Key Takeaways:
1. Define roles based on job functions and responsibilities, not individual users
2. Follow the principle of least privilege - grant only necessary permissions
3. Use department-level restrictions for sensitive data
4. Regularly audit and update role permissions as your organization evolves
5. Communicate role changes to affected staff members
6. Document your role structure for future reference and training
7. Test new roles before rolling out to production
8. Leverage copy, import, and export features for efficiency
For further assistance, please refer to your system documentation or contact your system administrator.
The articles you may find useful for you: