How to Manage Web to Lead Forms?
IN THE CRM
Web to Lead Forms Overview
Web to Lead forms are a powerful tool in the CRM that allow you to capture leads directly from your website or landing pages. These forms automatically convert visitor information into lead records in the CRM system, enabling seamless lead generation and management. This guide explains all the functions and features available for creating, configuring, and managing Web to Lead forms.
Accessing Web to Lead Forms
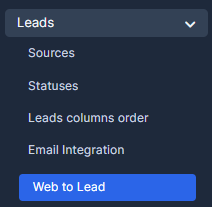
1. Navigate to the main menu and click on "Leads"

2. Navigate to the main menu and click on "Leads". In the Leads submenu, select "Web to Lead" or "Forms"
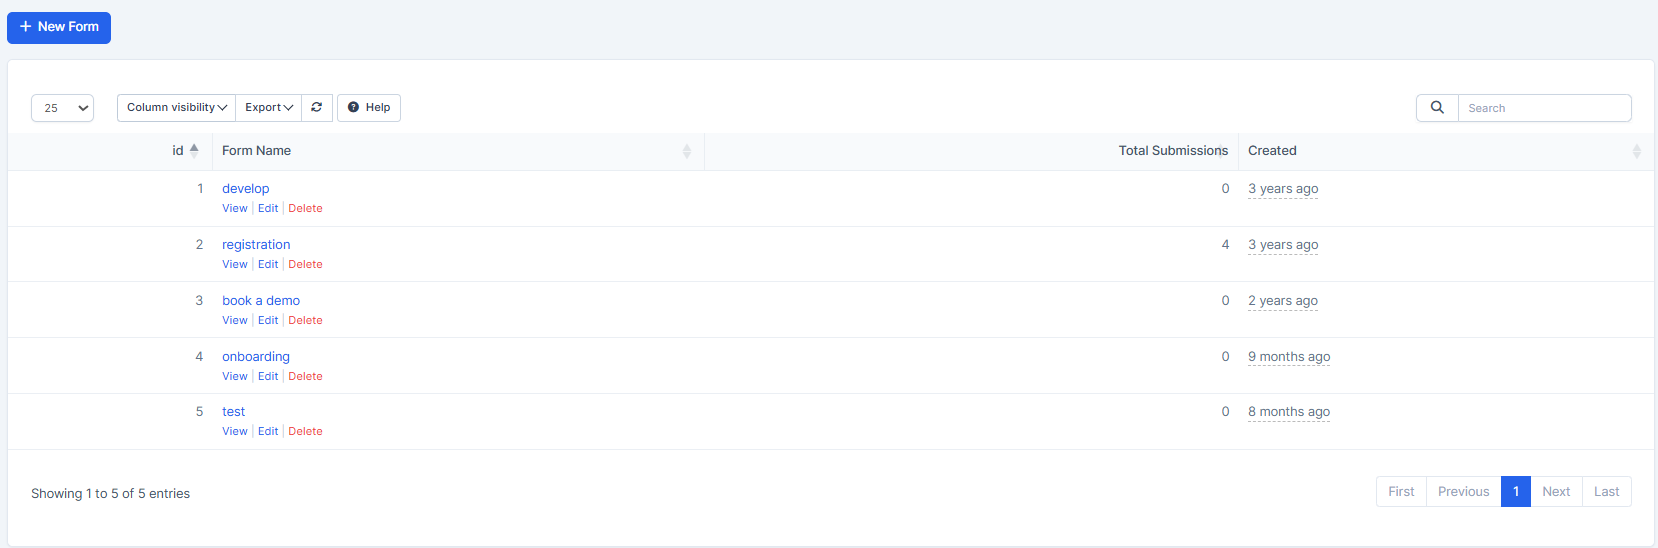
3. You will be directed to the Web to Lead Forms management page.
This page displays a list of all existing forms with columns showing:
- ID: The unique identifier for each form
- Form Name: The name given to the form
- Total Submissions: The number of leads captured by the form
- Created: The date when the form was created
Creating a New Web to Lead Form
1. On the Web to Lead Forms page, click the "New Form" button (blue button with plus icon)
![]()
2. You will be directed to the Form Builder where you can design your form
3. Follow the steps outlined in the Form Builder section below
Understanding the Form Builder
The Form Builder is where you design the actual form fields and layout. It contains several key elements:
Available Form Elements
The left side of the Form Builder shows elements you can add to your form:
1. Header - Add a title or heading to your form
2. Paragraph - Add descriptive text or instructions
3. File Upload - Allow visitors to upload files as part of their submission
4. Default Fields - Pre-configured fields are listed below the custom elements including:
- Name
- Position
- Email Address
- Phone
- Lead Value
- Company
- Address
- City
- State
- Country
- Zip Code
- Description
- Website
Adding Fields to Your Form
1. Click on any element or field from the left sidebar
2. Drag it to the right side to add it to your form layout
3. You can reorder fields by dragging them up or down
4. To remove a field, click the delete icon when hovering over it
5. Customize field labels and properties as needed
Form Information & Setup Tab
This tab contains four sub-tabs for configuring form settings:
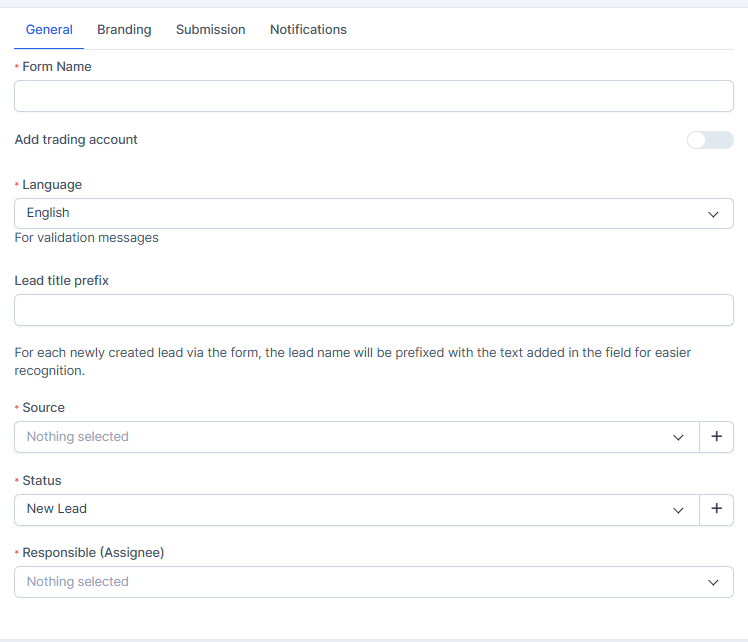
General Tab
The General tab includes essential form configuration options:
1. Form Name - The internal name for your form (required field)
2. Add trading account - Toggle option to include a trading account creation feature
3. Language - Select the language for validation messages (e.g., English)
4. Lead title prefix - Text that will be automatically added before each newly created lead's name
- For example, if you set "reg" as the prefix, a lead named "John Smith" would be stored as "reg John Smith"
- This helps you identify leads coming from this specific form
5. Source - Dropdown to select or create a source category (e.g., "Import") that will be assigned to all leads from this form
6. Status - The initial status assigned to leads created from this form (e.g., "New Lead")
7. Responsible (Assignee) - The staff member who will be automatically assigned to leads from this form (optional)
Branding Tab
The Branding tab allows you to customize the appearance of the submit button:
1. Submit button text - The label displayed on the submit button (default: "Submit")
2. Submit button background color - Hex color code for the button background (e.g., #84c529)
- Click the color picker to select a color visually
3. Submit button background text - The text color of the submit button (e.g., #ffffff for white)
- This controls the color of the button text
Submission Tab
The Submission tab controls what happens after a visitor submits the form:
1. What should happen after a visitor submits this form? - Three options:
a. Display thank you message (default)
- Shows a custom message to the visitor after submission
- Message to show after form is successfully submitted - Enter the text that will be displayed
- Example: "Thank you for registering!"
b. Redirect to another website
- Directs the visitor to an external URL after submission
- Useful for directing to a confirmation page or product
c. Redirect to platform with autologin
- Redirects to the CRM platform and automatically logs them in
- Creates a seamless experience for new account registrations
2. Auto mark as public - Checkbox option to automatically mark submitted leads as public
3. Allow duplicate lead to be inserted into database - Checkbox to control duplicate handling
- When checked: Multiple submissions from the same person will create separate lead records
- When unchecked: The system will prevent duplicate leads from the same person
Notifications Tab
The Notifications tab controls who gets notified when leads are submitted:
1. Notify when lead imported - Checkbox to enable/disable notifications (checked by default)
2. Notification recipient options - Three radio button choices:
a. Specific Staff Members - Notify designated staff members only
- Staff Members to Notify - Dropdown to select which staff members receive notifications
b. Staff members with roles - Notify all staff with specific roles
c. Responsible person - Notify the staff member assigned to the lead (from the General tab)
Integration Code Tab
This tab provides the technical code and links needed to display your form on your website:
1. iFrame Snippet Code
- Copy & Paste the code anywhere in your site to show the form
- You can adjust the width and height (in pixels) to fit your website
- Example code: <iframe width="600" height="850" src="https://crm.podcator.com/forms/wtl/[form-id]" frameborder="0" sandbox="allow-scripts allow-top-navigation allow-forms allow-same-origin allow-popups" allowfullscreen></iframe>
2. Share direct link - Direct URLs for the form
- Standard link: https://crm.podcator.com/forms/wtl/[form-id]?styled=1
- Link with logo: https://crm.podcator.com/forms/wtl/[form-id]?styled=1&with_logo=1
- Use these links for email campaigns, QR codes, or social media
3. SSL/Protocol Considerations
- If your website uses HTTP protocol, use HTTP in the iFrame
- If your website uses HTTPS protocol, use HTTPS in the iFrame
- Non-SSL installations need to place the link on non-SSL (HTTP) pages
Managing Existing Forms
On the Web to Lead Forms list page, each form has three action buttons:
1. View - Click to view the form as visitors would see it
2. Edit - Click to modify the form's fields and settings
3. Delete - Click to remove the form (this action cannot be undone)
Form Submissions and Tracking
1. The "Total Submissions" column shows how many leads have been created from each form
2. All submitted leads are automatically added to your Leads module
3. The Source field in the lead record will reflect the source selected in the Form's General tab
4. The Responsible person assignment can help route leads to appropriate team members
Best Practices for Web to Lead Forms
1. Keep forms concise - Ask only for essential information to increase completion rates
2. Use clear field labels - Make it obvious what information is needed
3. Set appropriate lead status - Use "New Lead" or "Unqualified" to start the sales process
4. Assign a responsible person - Ensures leads are immediately distributed to the right team member
5. Configure notifications - Make sure the right people know when new leads arrive
6. Test your form - Always test the submission process before publishing
7. Use the lead title prefix - Helps you identify and organize leads by source
8. Customize thank you message - Make it friendly and helpful
9. Monitor submissions - Regularly check the Total Submissions count
10. Keep form settings updated - Review and update language, status, and assignments periodically
Form Field Options
Each form field can be customized:
1. Field Label - Change the display name of the field
2. Required Fields - Mark important fields as mandatory for submission
3. Field Type - Different field types include text input, dropdown, file upload, etc.
4. Placeholder Text - Add helpful hints inside input fields
Integration with CRM Lead Management
Once a lead is submitted through a Web to Lead form:
1. The lead is automatically created in the Leads module
2. It receives the assigned Source from the form settings
3. It gets the default Status specified in the form configuration
4. It is assigned to the Responsible person if one is selected
5. The lead title includes the prefix defined in the form
6. Notifications are sent based on the Notifications tab settings
7. The lead can then be managed, contacted, and converted through the normal CRM workflow
Forms List Page Features
1. Column visibility - Click "Column visibility" to customize which columns display
2. Export - Click "Export" to download form data
3. Search - Use the search bar to find forms by name
4. Pagination - Navigate between pages if you have many forms
Troubleshooting Web to Lead Forms
1. Form not displaying on website - Verify the iFrame code is correctly copied and the URL protocol matches your site
2. Leads not appearing in CRM - Check that notifications are configured and the form hasn't been deleted
3. Duplicates appearing - Adjust the "Allow duplicate lead" setting in the Submission tab
4. Wrong person assigned - Verify the Responsible (Assignee) setting in the General tab
5. Submission issues - Test the form on different browsers and devices
Conclusion
Web to Lead forms provide a complete lead capture solution for your website. By understanding all the available configuration options and best practices, you can create effective forms that streamline your lead generation process and ensure leads are properly captured, organized, and routed to the right team members. Regularly review your forms' performance and settings to optimize your lead capture strategy.
Form Builder and Configuration: Features Guide
The Form Builder and Configuration tabs provide complete control over how your Web to Lead forms look, behave, and integrate with your CRM. By mastering these features, you can create highly effective forms that capture leads while maintaining your brand identity and ensuring leads are properly routed and processed in your CRM system.
Form Builder and Configuration Features Guide
The Form Builder and Configuration interface allows you to design your Web to Lead forms and set up all their behaviors. This comprehensive guide explains all the tabs, features, and configuration options available when creating or editing a Web to Lead form.
Three Main Tabs in Form Editing
When you edit or create a form, you'll see three tabs at the top:
1. Form Builder Tab
2. Form Information & Setup Tab
3. Integration Code Tab
Form Builder Tab
The Form Builder is where you design the visual layout and fields of your form.
Left Sidebar Elements
The left sidebar contains elements you can drag and drop onto your form:
Header Element
- Creates a title or heading section
- Useful for form titles like "Contact Us" or "Registration"
- Appears prominently at the top
- Can be styled with formatting options
Paragraph Element
- Adds text content to your form
- Use for instructions, descriptions, or explanatory text
- Example: "Please fill in all required fields"
- Can include HTML formatting
File Upload Element
- Allows visitors to upload files
- Useful for resumes, documents, or images
- Can specify file type restrictions
- Files are stored with the lead
Default Form Fields
The Form Builder includes pre-configured fields that map to CRM lead fields:
Contact Information Fields:
- Name (First and Last Name combined) *
- First Name
- Last Name
- Position/Title
- Email Address
- Phone
- 2nd Phone (secondary phone number)
- Password (if needed for registration)
Company/Location Fields:
- Company
- Address
- City
- State
- Country (dropdown with all countries)
- Zip Code
Additional Lead Fields:
- Lead Value (potential deal amount)
- Description (additional notes)
- Website
- DOB (Date of Birth)
- Telegram (messaging app contact)
- Whatsapp Enable (WhatsApp communication flag)
Custom Fields:
- Any custom fields you've created in your CRM
- Examples: test, Test field, funnel_param, Super-Test
Building Your Form
1. Drag elements from the left sidebar to the right preview area
2. Arrange fields in the order you want them to appear
3. Drag fields up or down to reorder them
4. Delete fields by hovering and clicking the delete icon
5. Click on fields to configure their properties
Field Customization Options
When you click on a field, you can:
1. Change the field label/display name
2. Mark field as required (visitor must fill it)
3. Add placeholder text (hint text inside the input)
4. Set default values
5. Adjust field width and spacing
6. Enable/disable the field
Form Information & Setup Tab
This tab contains four sub-sections for configuring form behavior and settings:
General Tab
Form Configuration:
1. Form Name (Required)
- Internal name for your CRM
- Used in the forms list and reports
- Example: "Contact Sales", "Newsletter Signup"
2. Add Trading Account Toggle
- Creates a customer/trader account when form is submitted
- Useful for registration forms
- New accounts receive credentials
- Can set auto-login features
3. Language Selection
- Sets the default language for form validation messages
- Options: English, Spanish, French, etc.
- Determines the language of error messages
- Field requirement messages appear in selected language
4. Lead Title Prefix
- Text added to the beginning of each lead's name
- Example: If you set "reg" and someone named John Smith submits, they'll be stored as "reg John Smith"
- Helps identify form source
- Useful for reporting and filtering
5. Source Selection
- Dropdown to select or create a lead source
- Examples: "Website", "Landing Page", "Import"
- All submitted leads get this source assigned
- Helps track where leads came from
6. Status Assignment
- Sets the initial status for new leads
- Options: "New Lead", "Unqualified", "Contacted", etc.
- Determines where leads start in your workflow
- Can be changed later in lead management
7. Responsible Assignment (Assignee)
- Select staff member to auto-assign forms
- Optional field (can be left blank)
- All submitted leads are assigned to this person
- Helps distribute leads to right team members
Branding Tab
Customize the appearance of your form's submit button:
1. Submit Button Text
- Default: "Submit"
- Examples: "Send", "Register", "Get Started"
- This text appears on the button
2. Submit Button Background Color
- Hex color code (e.g., #84c529)
- Click color picker for visual selection
- Sets the button's background color
- Matches your brand colors
3. Submit Button Text Color
- Hex color code (e.g., #ffffff for white)
- Determines the color of the button text
- Should contrast well with background
- Ensures button text is readable
Submission Tab
Controls what happens after someone submits the form:
Post-Submission Actions:
Option 1: Display Thank You Message (Default)
- Shows a custom message to the visitor
- Message field: Enter the text to display
- Example: "Thank you for registering! We'll contact you soon."
- Visitor stays on the form page
Option 2: Redirect to Another Website
- Sends visitor to an external URL
- Useful for directing to a thank you page
- Can redirect to a product page or other website
- Complete URL required (e.g., https://example.com/thank-you)
Option 3: Redirect to Platform with Autologin
- Directs to your CRM platform
- Automatically logs in the new user
- Useful for registration forms
- Creates seamless user experience
Additional Submission Settings:
1. Auto Mark as Public
- Checkbox to automatically mark submitted leads as public
- Checked: All submitted leads are public
- Unchecked: Leads are private unless manually changed
2. Allow Duplicate Lead to be Inserted into Database
- Checked: Multiple submissions from same person create separate leads
- Unchecked: System prevents duplicate leads from same person
- Useful for preventing accidental duplicate submissions
Notifications Tab
Controls who gets notified when leads are submitted:
1. Notify When Lead Imported
- Checkbox to enable/disable notifications
- Checked: Team members receive notification emails
- Unchecked: No notifications sent
2. Notification Recipient Options
Three radio button choices:
A. Specific Staff Members
- Notify designated staff members only
- Dropdown: Select individual staff members
- Best for: Routing leads to specific salespeople
B. Staff Members with Roles
- Notify all staff with specific job roles
- Example: Notify all "Sales Managers"
- Best for: Large teams with defined roles
C. Responsible Person
- Notify the person assigned to the lead
- Uses the "Responsible" setting from General tab
- Best for: Auto-assigned leads
- Ensures assignee knows about new lead immediately
Integration Code Tab
Provides code to display your form on your website:
iFrame Snippet Code
- Copy & paste code to embed form on website
- Adjustable width and height (in pixels)
- Example: width="600" height="850"
- Sandbox security attributes included
Share Direct Links
1. Standard Link
- Format: https://crm.podcator.com/forms/wtl/[form-id]?styled=1
- Use for: Email campaigns, QR codes, direct sharing
2. Link with Logo
- Format: https://crm.podcator.com/forms/wtl/[form-id]?styled=1&with_logo=1
- Includes your company logo
- More branded appearance
SSL/HTTPS Considerations
- HTTP site: Use HTTP form URL
- HTTPS site: Use HTTPS form URL
- Protocol must match your website
- Mixing protocols can cause security warnings
Form Status and Saving
When editing a form, click the Save button to preserve changes without submitting. Changes are only finalized when you:
1. Click Submit on the form page
2. Or Click Save in Form Builder
3. Changes are not live until saved
Copying Form Code
1. Copy the iFrame code from Integration Code tab
2. Paste into your website's HTML
3. Form displays in the specified dimensions
4. Visitors can submit through embedded form
Best Practices for Form Configuration
1. Field Organization - Order fields logically (contact info first, then company details)
2. Required Fields - Only mark essential fields as required
3. Clear Labels - Use descriptive, user-friendly field names
4. Appropriate Length - Keep forms short to increase completion rates
5. Source Tracking - Use distinctive source names for each form
6. Language Settings - Match form language to target audience
7. Notification Routing - Ensure leads go to right team members
8. Submit Button - Use action-oriented button text ("Get Started", "Register", etc.)
9. Thank You Message - Keep message helpful and friendly
10. Testing - Always test form before deployment
Troubleshooting Configuration Issues
1. Form not appearing on website?
- Verify iFrame code is correct
- Check protocol matches (HTTP vs HTTPS)
- Ensure URL is accessible
2. Submissions not being recorded?
- Check that form is properly enabled
- Verify Source and Status settings are valid
- Confirm notifications tab is configured
3. Duplicate leads appearing?
- Adjust "Allow duplicate lead" setting
- Check form submission limits
- Review source and status assignments
4. Notifications not being received?
- Verify recipient is selected in Notifications tab
- Check staff member email is configured
- Ensure "Notify when lead imported" is checked